

|
|
|
Post Reply 
|
| Author | |
PodPatrol 
Moderator Group 

Joined: 24 Sep 2009 Status: Offline Points: 22287 |
 Topic: FAQs (watch us Grow!) Topic: FAQs (watch us Grow!)Posted: 10 Feb 2010 at 10:55pm |
|
This is where r-Pod Nation will attempt to join visitors and members with reference material (contributed by r-Pod owners) concerning FAQs about the amazing r-Pod by Forest River.
Here we will list FAQs with links to reference material listed immediately after.
This list will grow accordingly to how many inquiries are necessary to respond on a consistant basis.
In other words, the most frequent questions that have definitive answers will be listed.
Questions concerning particular applications that and/or may produce many results can also be listed. Specifications can be listed. Procedures, etc etc etc .... so on and so on....
Please include the reference material when contributing a FAQ.
Also they can be brought to my attention via a PM or post, and I will include it with the other FAQs if deemed relative.
--------------------------------------------------------------------------------------------------------------
What Is An r-Pod ???
------------------------------------------------------------------------------------------------
CONTACT PEOPLE at FOREST RIVER R POD FACTORY
(brought to you by Sandpiper/CCDAMEEK) If you need spare or replacement parts for your Pod then Ms Marla Pullen is your person.
Marla Pullen Phone 574-642-3119 ext 209 E-mail mpullen@forestriverinc.com For Warranty Parts and Service the person to contact is Ms Susan Thornberg Susan Thornberg Phone 574-642-3119 ext 205 E-mail sthornberg@forestriverinc.com For general questions about the R POD the contact is Kristin Griffin, sales coordinator Kristin Griffin phone 574-642-3119 ext 213 E-mail kgriffin@forestriverinc.com If all else fails call the plant operator at 574-642-3119 ext 0 It sounds like a busy signal but don't hang up and the operator will be glad to help you with getting an answer to your question. If the person you are calling is not at their desk please leave a message with your name and phone number and they will return your call as soon as they can. E mail seems to be the preferred method of communication so if possible send them an e-mail and they will return it. Surveyor / r-pod warranty administrator
Amber Wilson
Phone/ 574-642-3119 x208
fax/ 574-970-6811
email/ awilson@forestriverinc.com
Surveyor / r-pod parts department
Brandy
Phone/ 574-642-3119 x209
---------------------------------------------------------------------------------------------------------
What do I look for (or do, or ask) during the "Run-Through" at the Dealer ???
by Gmandual
Check doors and hatches. Make sure doors shut, lock, unlock and seal properly.
Check seals around screen door and door.
Make sure you know how to light propane stove and that it lights properly.
Make sure that you understand how/when to use different modes on fridge, how to switch it between the different modes, and that it works properly in all modes. AC/DC and propane.
Have them show you where the bypass valves are on the water heater. Make sure valves are in correct position for operation. Make sure they show you correct orientation of valves for normal operation and bypass mode for winterization.
Have them show you how to use the water pump, and where the access panel is for the water pump. (its under the cabinet under the sink on the 172) Make sure water pump works. You will needs to know where the water pump is as well as the water heater bypass valves for winterization.
Check water pump operation without a hose hooked up to city water connection on trailer. Running water pump without a hose hooked up to city water connection helps make sure the backflow valve is working properly.
Make sure water heater lights properly and heats water. Check that you have hot water in shower and in sink. Have them show you where the AC water heater switch as well as the propane switch.
Check water pressure at sink and shower. Sometimes screen on faucet has to be cleaned out because of plastic of metal shavings from manufacture.
Test all AC power accessories. If equiped with TV and Microwave test the TV and microwave to make sure both are functioning properly.
If equiped with TV and antenna have them show you operation of antenna amp (in cabinet above stove) as well as how to program in TV channels.
Test furnace to make sure that it ignites and runs properly. Check furnace for excessive rattle. Some times "junk" from construction get in the grate and can cause rattling noises.
Test AC unit on high/low and fan only modes. Make sure it is cycling properly (on/off) when cooling.
Check fantastic fan (bathroom). Make sure it open and closes all the way with out binding and that fan runs without excessive vibration or noise.
Make sure toilet flushes properly, and you know how to flush the toilet. (sounds silly but have seen people struggle with that one. )
Check fabric undercoating on trailer. Make sure it (black cloth type stuff) covers entire bottom of trailer and that there aren't any major tears, rips or uncovered areas. This keeps water from getting into bottom of the trailer. Look up under trailer and check corners as that is usually the first sign of a problem if there is one.
Have them show you where the low point drain valves are on the trailer. (under wheel well on drivers side of 172). You need to know where those are for winterization.
Make sure the battery the comes with the trailer is a Deep Cycle battery and not a regular car battery. Most reputable dealers will give you the right ones, but have heard folks getting the wrong one.
Make sure all light bulbs in all the lights are functioning properly.
Check tracks on the drawers. Make sure they move in and out easily and don't have excessive wobble that would indicate a broken track for one of the drawers.
If you aren't familiar with how to do it. See if you can get them to show you correct method to level the trailer.
If purchasing R-DOME or looking to purchase R-DOME in the future check screws in RDOME track on trailer. Make sure screws don't stick out and that there aren't any sharp jagged edges on the track.
Check Grey Water and Black water release valves. Make sure they operate smoothly and seal properly.
Check the stabalizing jacks to make sure they aren't bent or damaged. Sometimes dealers damage them while moving trailers around the lot.
Run Stove (on High) and furnace at the same time. Check to see if you hear a pinging noise coming from the propane tank. If you do then the propane regulator might need to be replaced.
DO THE INSPECTION PRIOR TO SIGNING FINAL PAPERS. Virtually all your leverage goes out the door after you sign the final papers, so you should always do your inspection prior to signing papers. -------------------------------------------------------------------------------------------------------------
Searching the Forum:
by gmandual
Have run into difficulties trying to find old posts, and I have found they are there but the defaults on the "search' doesn't always give you what you expect so thought I would write a quick tutorial.
By default if you just hit the "Search" button and type in a phrase it appears that it searches for your words but only going back to the last six months. If you click on the "search" button and select "Advanced" you get more options on your search.
You can search subjects, message body, phrases, posts by specific users. I have had the best luck finding posts by following the procedure below:
1. Click on Search Icon
2. Select "Advanced Search"
3. Type your keywords into the "search by keywords" field
4. Make sure that "All Forums" is highlighted in the "search forums" field
5. Change the "find posts" field from being the default of "6 months" to "Any date" (at top of list)
6. Click I "start search" button
This should allow you to search through all posts on the forum and should help you get what you are looking for. The fact that the default search only searches back for the last 6 months seems to throw folks for a loop and makes some topics/info hard to find.
-------------------------------------------------------------------------------------
HOW TO POST PICTURES AT r-POD NATION (by Butterfly-Lee)
------------------------------------------------------------------------------------- TOWING A POD:
How Towing Weight Distribution Systems Work:
posted by PodPatrol 2/11/10
or
a place about towing r-Pods
Tips @ etrailer
-------------------------------------------------------------------------------------------------------------------------
Where can I find the VIN # on the actual trailer?
Also, whats the decoding of the VIN#?
posted by Sandpiper 2/12/10
The VIN is located on a decal on the lower front of the Pod on the left side. It is a yellow tag with other information along with the VIN There are other tags located in the same place.
It is also stamped into the trailer tongue on the upper left side just behind the propane bottle. You might try http://www.fedcertsuite.com/technical_support/New%20Trl%20Mfg%20Guide.html for the VIN decode info. Or check here http://en.wikipedia.org/wiki/Vehicle_Identification_Number Or for the real lowdown: http://www.access.gpo.gov/nara/cfr/waisidx_06/49cfr565_06.html -------------------------------------------------------------------------------------------------------------------- What's The Deal With Batteries ???
This link is an excellent source for all things 12V.
----------------------------------------------------------------------------------------------
Do/Will I need the Lift Kit (Axle Riser?)
This link will take you to some interesting posts concerning the "Lift Kit" offered by Forest River that will lift the r-Pod body an estimated 3" above the current delivery height.
I don't believe that it actually "raises" the axle, but instead lifts the body of the r-Pod for extra clearance should you feel you need it.
------------------------------------------------------------------------------------------------
What do I need to plug in my r-Pod at home ???
(information supplied by Sandpiper)
 -----------------------------------------------------------------------------
What are my Water Line Shut-Off Valves suppose to look like during Normal Use ?
picture posted by rabuol/comments by podpatrol
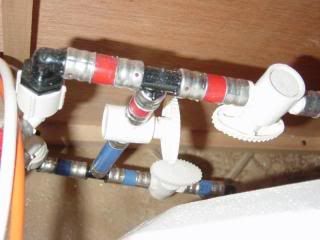 The above picture is the way to have the WSOV (water shut off valves) turned during normal use.
You would turn these "opposite" for winterizing, and leave "opposite" till after flushing and/or sanitizing, then return to the position pictured above for normal use.
The picture above is allowing Cold (blue marked pipe) water to enter the WH (water heater) and a line for Hot (red marked pipe) water to leave the WH when requested. In the "opposite" position the cold water "by-passes" the WH altogether.
-----------------------------------------------------------------------------------------------
How Do I Winterize My r-Pod ???
posted by Outbound & TechnTrek
1) Open both low-point drains underneath the camper.
2) Attach a "blow-out plug" to the city water connection. This has an air inlet on one end like the valve stems on your tires, and threads to attach to the water connection. Apply LOW pressure air (less than 20 psi) for several seconds. Any RV dealer should have one of these plugs.
3) Remove the blow-out plug.
4) Outside, remove the plug on the hot water heater to check the anode rod and replace if necessary (about every two years). The water heater must be stored dry - do not try to fill it with antifreeze. Wait for the water to stop running out of the drains and plug hole.
5) Re-insert the plug and close both low-point drains.
6) Turn the bypass valves on the hot water heater. The valves are inside the trailer - mine are under the bed on the road side.
7) Inside the trailer, remove the access panel for the water pump. On the intake line for the water pump, you'll notice a valve and about 2 1/2' of tubing that's loose on one end. Flip the valve and put the loose end into your jug of RV antifreeze (DO NOT USE AUTO ANTIFREEZE). The pump will now draw from the jug of antifreeze instead of your fresh water tank. 8) Turn on the switch for the water pump.
9) Turn on the taps at the sink and in the shower. Let them run until the water is the colour of your antifreeze (pink). 10) Run the toilet until the water is pink. 11) Outside and underneath the trailer, open your freshwater tank's drain valve and allow it to empty. 12) Open the low-point drains, let them run until you see pink.
13) Pull the hose out of the antifreeze bottle just enough so it can't suck up any more antifreeze. Turn on the sink again for a second or two until the antifreeze is out of the intake line. This keeps the sticky antifreeze from running all over the floor when you pull the intake completely out of the bottle.
14) Close the valve near the water pump, stow the intake hose and close the access panel, turn off the power for the water pump.
How Do I Un-Winterize (Summerize) My r-Pod ???
posted by Outbound
While you're dewinterizing, its a great time to sanitize your water system.
Thats it! You're done! Dewinterized and sanitized!
Please note: DO NOT use the pressure-relief valve on your water heater to 'fill' your tank. There is supposed to be a pocket of air at the top of the tank to accommodate expansion of the water while its heating.
----------------------------------------------------------------------------------------------
Changing Water Heater Element in a 2010 r-Pod 177
posted by Sandpiper
(this may also apply to your model, then again, it may not. Please check your documentation.)
**Yeungling is optional**
Lesson one: Buy your replacement element from Home Depot #014717158961 120V 1500W Camco # 2142 cost $9.67. The same element from a RV site was $11.36 with $6.98 shipping. A Suburban element # 520789 will set you back at least $19.50 + $4.59 shipping.
Lesson two: You will need a Screw in Element Wrench Camco # 15493 also available from Home Depot#014717154932 for $6.47. Unless you have a much better selection of wenchs  Lesson three: It is simple to replace the element .
WARNING: SHUTOFF ALL POWER TO THE WATER HEATER: I RECOMMEND REMOVING ALL 120V FROM THE POD: OPEN the HOT Water faucet and leave it open until you are finished with replacing the element and refill the water heater. Look at the manual figure 15 page 9 and remove these parts. 1.) The burner assembly(item 26) 2.)The outlet Manifold (item 37) along with items 55 and 56 which are the tubing nuts that are on item 37. This stuff has to be removed to get the element out. 3.) Remove the three screws holding the element cover (item 24 and it's gasket) 4.) Remove the two wires attached to the element. When the next step is performed the water heater will drain so be ready. 5.)Using the Element Wrench and a screw driver, remove the screw in heating element(item 28) 6.)Install the new heating element and using the Wrench and screw driver tighten the new element snug. Reverse the above steps and replace the items that were removed. Now refill the water heater and when no more air comes out of the faucet, close the faucet and re apply 120v to the Pod and to the water heater. Wait about 1/2 hour and the water should be rather warm. The water heater has a recover rate of approx 6 gallons per hour so 1/2 hour should yield some rather warm water. You are done and have saved at least $50 to $75 probably more at today's mechanics rates. My cost $24.09 + a Yeungling(optional) because I didn't learn about Home Depot Elements until I had ordered one on line. It didn't take me an hour to replace the element and the tools I used were 1 Cresent wrench 1 Phillips head screw driver 1 slotted head screw driver 1 7/16" open end wrench 1 5"(long)Screw in Element Wrench and One Yeungling ***Yeungling is optional***
-----------------------------------------------------------------------------
UNDER PRESSURE
What's the deal with RV Water Pressure ???
(article can be found at http://www.rvwaterfilterstore.com/ABPressure.htm)
rvwaterfilterstore.com
Low Pressure will Drive you Crazy - High Pressure will Burst your Pipes - What's a Person to Do?
The clear canister to the right is a good example of a plugged filter, it's a wonder these folks are getting any flow at all.
Internal Plumbing Systems may Be Inadequate
Manufacturers will scrimp on anything and everything to cut costs, and this includes the plumbing system. Undersize pipe and restrictive fittings can contribute to the low-flow problems you experience. If you check the flow in a brand new RV that is hooked up to a municipal water system, everything may look good. But, if you take this same rig out to an RV park and hook up a pressure regulator and a filter, it may suffer. Unfortunately, there is not much you can reasonably do to improve an RV's plumbing. Fixtures Can Also Seriously Reduce Flow Your plumbing fixtures are the final place that flow restrictions can occur. Sink faucets and shower valves often have very small orifices that seriously limit the amount of water that can pass through them. Sometimes, these restrictions are removable, and are included to meet Federal water consumption standards. In any case, you can find better-flowing fixtures by carefully shopping around. ---------------------------------------------------------------------------------------------
HOLDING THINK TANK:
Article found at : http://www.newrver.com/holdingtank.html
Black and Gray Water Holding Tank Maintenance
By Charles Bruni Copyright 2007 by RVbookstore.com
-------------------------------------------------------------------------------------------------------- WHEEL BEARING LUBRICANT
posted by Sandpiper
Since there seems to be a little confusion about the grease to use with the R Pod's wheel bearings, I decided to do a little investigating to see what I could find locally.
Here are the results of my investigation. 1.) Walmart -- Super Tech - Muti Duty Complex Grease - #68113147282 - $3.22/ 14oz tube 2.) Tractor Supply -- Lithium Multi Purpose Grease - # 08 04941 - $1.49 / 14 oz tube ( since the tube says "formula is a secret" I would be a little leary of this one) 3.) Auto Zone -- Valvolene Automotive & Industrial General Multi Purpose Grease - # W609- $3.99/14 oz tube Auto Zone-- Coastal All Purpose Grease - $2.99/14 oz tube 4.) NAPA -- Premium Performance Multi Purpose Wheel Bearing & Chassis Grease - 75-600 - Price not marked So there are some of my local sources for grease compatible with what is called for by Lippert. The warning to not mix greases doesn't mean you can't use a different brand it means don't mix Lithium based grease with Molybdenum based grease or any other base. The base of the grease should be clearly marked on the container. The important things to look for are Lithium or Lithium Complex. DO NOT use Molybdenum or Moly based greases.
Look for NLGI No. 2 on the tube. If possable look for a drop point equal to or greater than 446deg F . Those are the main things you need to be concerned with when purchasing grease for your R Pod wheel bearings. VIDEO OF r-POD WHEEL LUBRICATING
posted by olphart/Sandpiper
----------------------------------------------------------------------------
Battery Monitor Translation:
posted by Outbound
C - Charged
G - Good F - Fair L - Low -----------------------------------------------------------------------------
SWAY CONTROL
posted by etrailer
Sometimes a sway control system is not needed to get sway under control. If the trailer is riding nose up, switch to a draw bar with a lower drop and get the trailer level. Check out this article:
http://www.etrailer.com/faq-ballmount.aspx
You can also try re-organizing the load in the R-Pod. Too much tongue weight or hitch weight can make the rear of the vehicle squat which isn't good. The opposite condition is just as bad, maybe worse. Too little weight on the nose and the trailer can get squirrely. The best way to check if your tongue weight is to low is to hit up a truck scale and do some weighing. Load the Pod like you were getting ready for a trip. Head to a scale and pull just the Ridgeline onto the scale with the RPod hitched to it. This will give you the combined weight of the truck and tongue weight of the trailer. Take the Pod off and weigh the truck. The difference is the tongue weight of the trailer.
Weigh the RPod by itself. That's the gross trailer weight. The tongue weight should be between 10 and 15% of the gross weight. If it's not, re-situate the load get the tongue weight in that range.
If all this is in order, than sway control may be needed. I would check those first because I find nothing more frustrating than making a purchase to fix a problem, only to find that it doesn't.
-------------------------------------------------------------------------------------------
IF YOU HAVE ANYTHING TO ADD, OR IF YOU HAVE QUESTIONS, PLEASE CONTACT A MODERATOR OR THE MEMBER THAT SUPPLIED THE INFORMATION.
Thank-You ! |
|
 |
|
|
Post Reply
|
|
 Tweet
Tweet
|
| Forum Jump | Forum Permissions You cannot post new topics in this forum You cannot reply to topics in this forum You cannot delete your posts in this forum You cannot edit your posts in this forum You cannot create polls in this forum You cannot vote in polls in this forum |


")


 FAQs (watch us Grow!)
 Topic Options
 plumbing operates at about 60psi, and this can be adequate for RVs, too. If your water supply pressure is approaching 100 psi, you are risking an expensive failure of your plumbing system. You should limit your pressure to 60-65 psi to be safe, and to do that, you can install a
 contaminants. Fortunately, there are a huge number of "holes" in a filter, and the bigger the filter unit, the more "holes" it has, and the better the flow. So, to achieve better flow through a filter, use a bigger filter that has more filtration area. A small,
  in your RV, you will want to go with the largest filtration system that will fit your needs to avoid flow restrictions. Another factor to consider with filters is that as they get plugged with contaminants, their flow rate decreases. If you find your flow rate dropping when you are using filters, it may be time to clean or replace them.