Opening windows in 172 bunks
Printed From: r-pod Nation
Category: Forest River r-pod
Forum Name: Modifications
Forum Description: Mod your Pod....then post your pictures
URL: http://www.rpodNation.com/forum_posts.asp?TID=4459
Printed Date: 23 Apr 2024 at 2:51am
Software Version: Web Wiz Forums 11.0 - http://www.webwizforums.com
Topic: Opening windows in 172 bunks
Posted By: HuronSailor
Subject: Opening windows in 172 bunks
Date Posted: 08 Feb 2016 at 1:41pm
|
We wanted some bunk windows on the port side of the bunks opposite the door to create some nice breeze at night. Since they'll be out from under the protection of the dome or awning, we wanted them to crank out so they could stay open at night in a light rain, and we wanted frosted glass rather than smoked. Sometime back I took some pictures of our pod on a frosty morning, which showed us the locations of all the aluminum studs perfectly. So armed with that picture, a stud finder, straight edge, and some masking tape I made a basic layout on the outside of the pod. 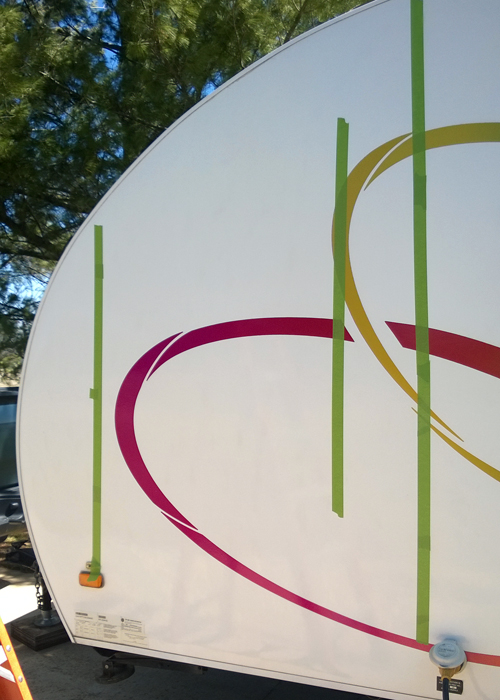 The two outer lines are the aluminum studs and the middle line is the edge of the bathroom wall. So except for the upper bunk there's really nothing between the left and middle line to worry about. This is my basic working area. 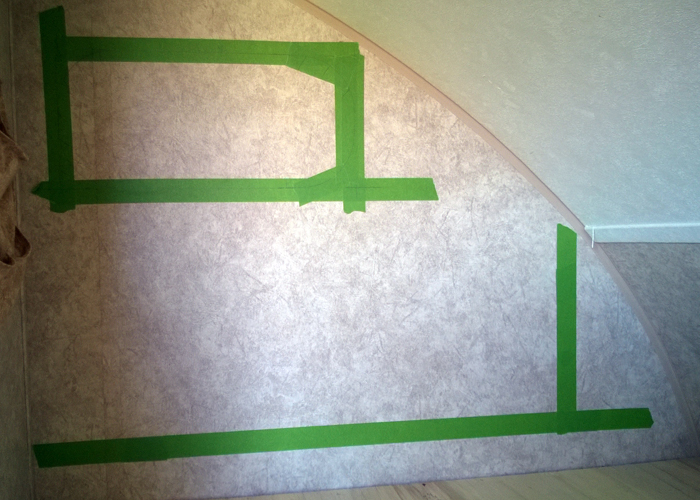 Now we're inside. The layout and process is the same for both bunks, but I'll concentrate on the top bunk. The horizontal line is the top of the mattress, and the vertical line is the front aluminum stud, or the left line in the previous picture. I made a template of the window cutout, and this is drawn on the green tape rectangle. Of course, the window is bigger all around than the cutout, so make sure you stay far enough away from the walls and ceiling. I measured and checked my layout about 37 times, but finally it was time to just do it. So I drilled a pilot hole inside the cutout line, and armed with my jigsaw, I hacked two 8" x 17" holes in the side of the pod. That was intense, let me tell you. 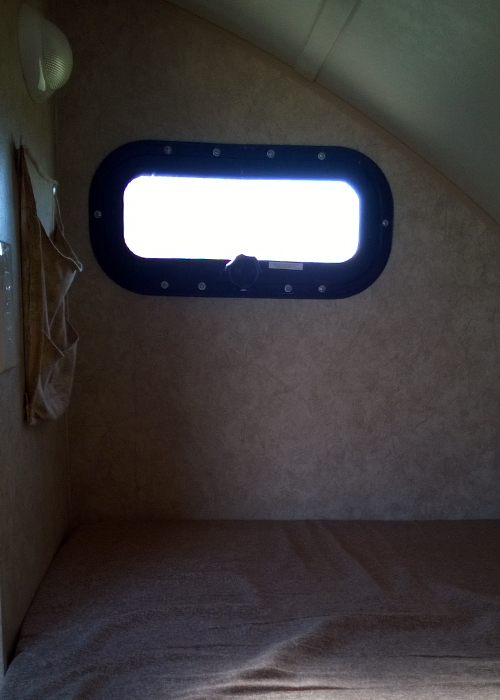 Skip ahead, and here's the top window installed. Just have to touch up the screws with some black paint and I'm done. The frosted glass lets in some light but still gives you some privacy when you're reading in the bunk at night with the lights on. I hate it when people read over my shoulder. 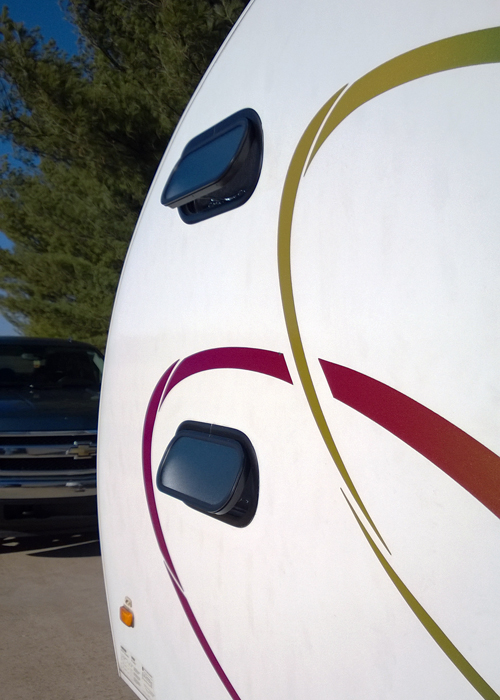 So here's the two finished windows. The windows are made especially for Scamp, and they'll be happy to sell you them for $80 apiece, though they may be on back order. There are a few issues you need to know about, however. (This mod looked pretty easy so you had to know this was coming.) First of all, the Scamp folks are really nice, but they have no idea how an rpod is put together, so they can't give you any advice as to whether or not these windows will work for you. They're only returnable in new condition with pre-authorization, and then subject to a 20% restocking fee. I did check on custom windows, but the price made my heart skip a beat. This is the best window I could find after a LOT of looking, so what the heck - for you guys, I'll just go ahead and do it. I'm that kind of guy. Second, the trim/mounting rings that come with the windows absolutely will not work with the pod, no matter which way you turn them or how much you cuss. These windows are a bit thicker than the Scamp and rpod walls, so the mounting/trim rings work differently than the rest of the windows in the pod. I had a hunch this might be the case, so before I ordered, I lined up a source to make me whatever I might need for trim/mounting rings. Once I got these windows, figured out what I needed, and made a really really nice professional sketch, my source backed out. Crap. This forced me to modify the rings that came with the windows. This involved a hand grinder, jigsaw with metal blades, file, some blood and some cussing. The mods to the trim rings are shown below: 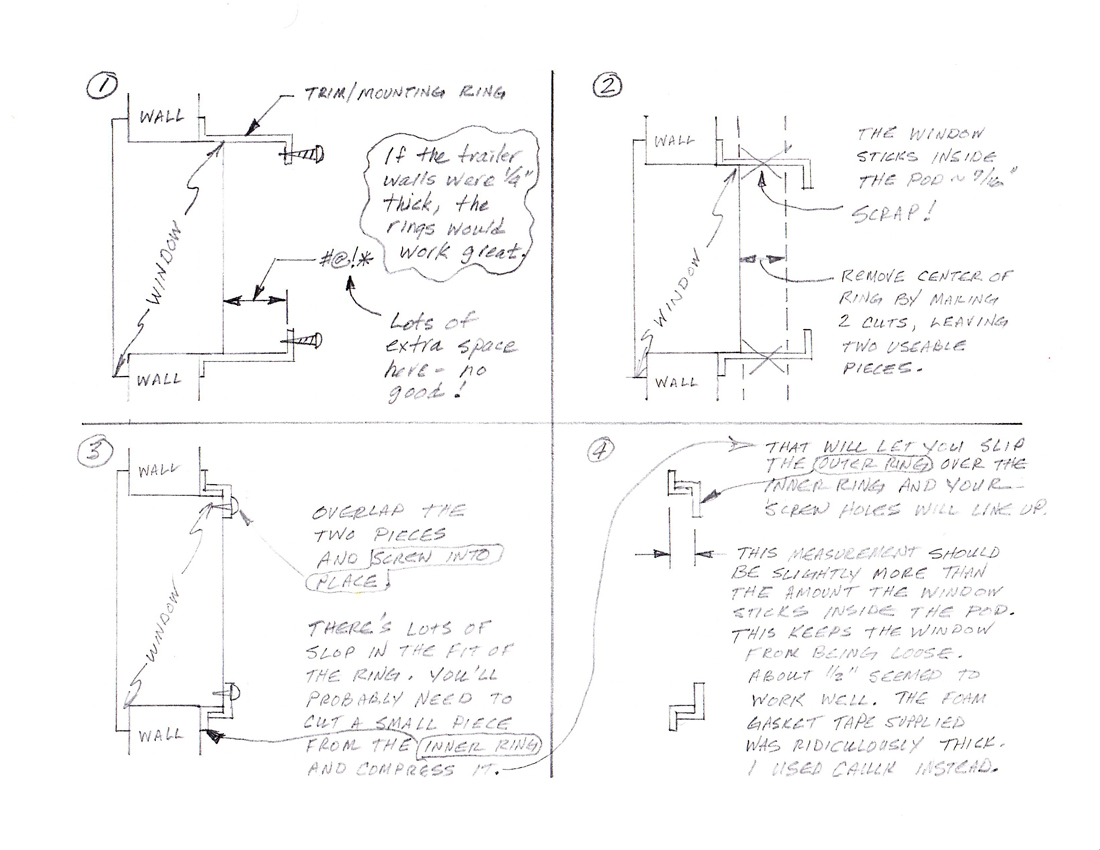 ------------- .: Mark & Beth :: Silverado 5.3L :: "arrrr"Pod 172 :: http://picasaweb.google.com/mark.a.mowery - My Albums :: http://ourrpod.blogspot.com/ - OurPod Blog :: |
Replies:
Posted By: fdgibbons
Date Posted: 08 Feb 2016 at 3:36pm
|
Thanks again Mark. Using your layout diagram, I plan to install the windows on Wednesday or Thursday. Will share photos when finished. Also plan to install slider in door. The porthole windows are a little problematic in that the outer and inner circumferences of the window and trim are a little different. Frank |
Posted By: Lark
Date Posted: 09 Feb 2016 at 8:02am
|
Hi Mark what great posting! It will be very helpful to anyone thinking of mounting windows. Lark F-150 R-179 ------------- Lark |
Posted By: fdgibbons
Date Posted: 18 Feb 2016 at 9:21pm
|
Mark, I decided to put 14" X 16" horizontal slider windows (Vintage Technologies) in the bunk area instead of the portholes. The windows are a little larger than the ones you installed. When viewed from the outside, Are your windows lined up one exactly above the other? The Windows have been ordered and our on the way. I will be cutting the holes on Monday or Tuesday. Thanks, Frank |
Posted By: HuronSailor
Date Posted: 19 Feb 2016 at 8:10am
Yes. I measured from the bathroom wall. ------------- .: Mark & Beth :: Silverado 5.3L :: "arrrr"Pod 172 :: http://picasaweb.google.com/mark.a.mowery - My Albums :: http://ourrpod.blogspot.com/ - OurPod Blog :: |
 fdgibbons wrote:
Posted By: Wyexplorer
Date Posted: 08 Aug 2017 at 8:14pm
| Do the Scamp windows have screens? |
Posted By: fdgibbons
Date Posted: 09 Aug 2017 at 12:28am
|
I don't know about the Scamp windows, but the Vintage ones do. Frank |
Posted By: HuronSailor
Date Posted: 09 Aug 2017 at 7:42am
|
The Scamp windows do have screens. I don't think they have these exact windows anymore. The newer version is slightly larger and divided into three sections. The square section in the middle opens but the end sections do not. ------------- .: Mark & Beth :: Silverado 5.3L :: "arrrr"Pod 172 :: http://picasaweb.google.com/mark.a.mowery - My Albums :: http://ourrpod.blogspot.com/ - OurPod Blog :: |
Posted By: Wyexplorer
Date Posted: 02 Oct 2017 at 12:56pm
Did this work? I'm very interested in trying the same thing with the same windows exept I will likely remove the top bunk and leave a shelf of some sort and leave the entire wall on the drivers side above the bottom bunk open for a window. Thanks!
|